No code data science
AI & Analytics Engine Tutorial 1/4: Creating A ML Project
In this article, you will learn how to leverage PI.EXCHANGE's AI and Analytics Engine to Create your first data project.
This article is 3/4 of the AI & Analytics Engine tutorial series and will demonstrate how to leverage The Engine to build an AI application.
The previous article in the series, AI & Analytics Engine Tutorial 2/4, covered how to prepare our data using The AI & Analytics platform (Engine). Once we have finalized and committed our recipe in the data preparation phase, the Engine saves our newly prepared dataset - this is the data we use to build our AI application.
New to no-code AutoML platforms? This article explains AutoMLs, and how you can use them to innovate with ML easily!
PI.EXCHANGE offers an exciting feature called an "App" (short for application); The app feature is a special container that exists within the Engine to permit users to store multiple machine learning models that have been trained and evaluated on the same training and testing data. Essentially, an app allows users to train, evaluate, and compare different machine learning models (referred to as "templates" on the Engine) on the same train and test data.
To create an AI application we have to possible methods to follow:
For this tutorial, we are going to be following method 2 to create our new prediction task application. Upon selection, we would be presented with the "New App" menu which asks us to fill in some details related to the app, such as, the name of the app, the dataset we want to use to build the app, and the target column (what we want to predict). The Engine will automatically infer the type of problem (whether it be classification or regression) based upon the target column.
.gif?width=800&name=USE%20THIS%20SIZE%20Blog%20Images%20(6).gif)
The next tab in the "New App" menu is the "Create Your Application" tab. In this section, we would be asked to select whether we want our app to be created with a default configuration. Default configuration means that our dataset would be split into 80% training data and 20% test data so that we could evaluate our machine learning model later on. Therefore, advanced configuration puts the power into the hands of the user to change the proportions of the training and test set splits.
For our example, we will select the advanced option and split our data into 70% training data and 30% test data.
.gif?width=800&name=USE%20THIS%20SIZE%20Blog%20Images%20(7).gif)
Once we've completed that, the app will be created and the app ID can be found in the browser's address bar.
Now that we've processed the data and created our application, it's time to build a machine learning model. A great feature about the Engine is that models trained within the same application would automatically be trained and tested using the same train-test split that was created upon creating the application - If you're unsure why this is so good, all it means is that our models can be compared fairly and scientifically.
Once again, there are 2 ways to go about creating your machine learning model:
We are going to use the 2nd option for our use case. A "New Model" dialogue box will be shown to us where we must select the feature set we wish to train on - For more on how to create a feature set, see the Documentation.
.gif?width=800&name=USE%20THIS%20SIZE%20Blog%20Images%20(8).gif)
When we select a feature set and go to the next screen, we will be presented with a list of Machine Learning models that we can choose from. Additionally, we would be shown the output of the model recommender - the idea of this is to aid us in selecting a model template that is effective for the problem we wish to solve - Click here to see how the recommender estimates the model's performances.
The image below is a visual representation of the "Choose a model" step. Here are the definitions of the number labels [Source: Knowledge Hub] :
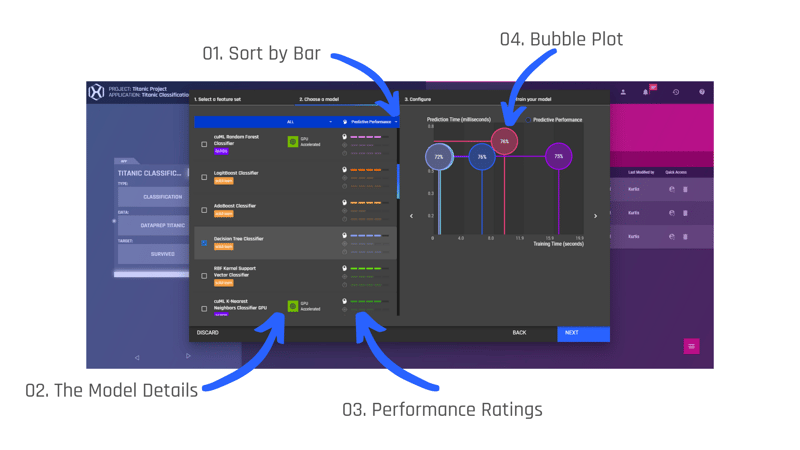
In the next heading, "Configuration", you can configure the model with custom hyperparameters or decide to use the default hyperparameters of the models - a hyperparameter is a parameter whose value is used to control the learning process, therefore, it must be set before training. We will stick with the defaults for this application, hence we select "next". This tab provides us with an overview of the model we've selected. Given everything looks okay, we select "Train Models" to begin training.
.gif?width=1000&name=USE%20THIS%20SIZE%20Blog%20Images%20(9).gif)
Get started with no code machine learning with this article!
The next article in the tutorial series will cover how we could knit all of the previous tutorials together by making the application we built in this article accessible to end-users. This is done by deploying the application, which could all be done within the PI.EXCHANGE AI & Analytics Engine.
Go on to part 4 of the tutorial - Deploying your Model.
For a recap of part 2 on data preparation, read this article.
Want some help with your ML project? Reach out to us! Our team is happy to help you take your project further.

In this article, you will learn how to leverage PI.EXCHANGE's AI and Analytics Engine to Create your first data project.
In this article, you will learn how to leverage PI.EXCHANGE's AI and Analytics Engine to deploy your AI application so it can be consumed by other...
The Engine’s formula editor lets you easily use custom-made data wrangling formulas, to transform datasets in your data preparation step.